Clamp and Saw Guide: A Comprehensive Overview (Updated 04/07/2026)
This guide details essential tools for precise cuts, focusing on self-clamping straightedge designs inspired by IBUILDIT.CA, addressing grip issues
found in aluminum versions.
Clamp and saw guides represent a cornerstone of accurate woodworking, enabling consistently straight and precise cuts that are often difficult to achieve freehand. These tools bridge the gap between the operator’s skill and the demands of a project, particularly when dealing with sheet goods or requiring repetitive cuts. Historically, woodworkers relied heavily on hand tools and keen eyesight, but modern guides offer a mechanical advantage, minimizing errors and maximizing efficiency.
The evolution of these guides has seen materials shift from traditional wood, as highlighted by IBUILDIT.CA’s exploration of DIY designs, to aluminum and acrylic options. Early aluminum guides, while promising, sometimes lacked sufficient clamping force, leading to slippage and compromised accuracy. This spurred innovation towards self-clamping mechanisms and improved material choices. Understanding the principles behind these guides – how they stabilize the saw and secure the workpiece – is crucial for any woodworker seeking professional-quality results. They are invaluable for both beginners and experienced craftspeople.
What is a Clamp and Saw Guide?
A clamp and saw guide is a tool designed to maintain the linear path of a saw, ensuring straight and accurate cuts. It typically consists of a rigid straightedge – constructed from materials like wood, aluminum, or acrylic – coupled with a clamping system to firmly secure it to the workpiece. As noted by IBUILDIT.CA, a key feature is the ability to grip tightly, preventing slippage during operation.
These guides aren’t merely passive restraints; they actively control the saw’s movement. They function by providing a reference surface against which the saw base travels. The clamping mechanism can range from simple screw-down systems to more sophisticated self-clamping designs. The primary goal is to eliminate deviations from a straight line, resulting in clean, precise cuts. They are essential for tasks like ripping plywood, cutting dados, or trimming panels to size, offering a significant improvement over freehand sawing.
Why Use a Clamp and Saw Guide?
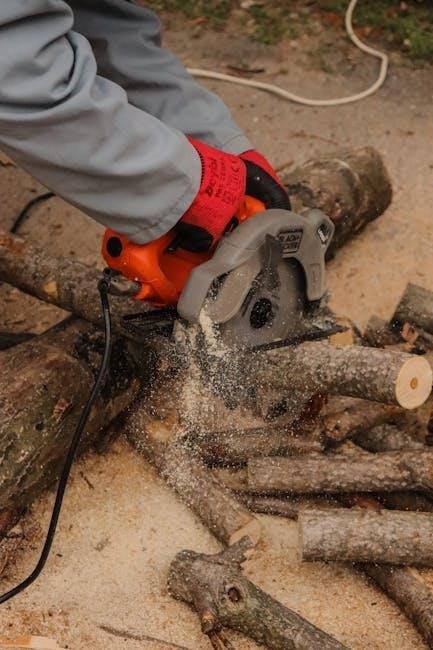
Employing a clamp and saw guide dramatically enhances cutting accuracy and repeatability, minimizing errors inherent in freehand techniques. As highlighted by IBUILDIT.CA, commercially available aluminum guides can sometimes lack sufficient grip, leading to frustrating slippage and inaccurate results. A well-designed guide eliminates this issue, providing a stable and reliable cutting platform.
Beyond accuracy, guides improve safety. By securely holding both the saw and workpiece, they reduce the risk of kickback and accidental movement. They are particularly beneficial for beginners or when working with expensive materials where mistakes are costly. Using a guide also allows for consistent angle cuts, crucial for projects requiring precise joinery. Ultimately, a clamp and saw guide translates to professional-quality results, saved time, and reduced material waste.

Types of Clamp and Saw Guides
Various guides exist, including straightedge, circular saw, jig saw, and router options, each designed for specific tools and cutting applications.
Straightedge Clamp Guides
Straightedge clamp guides are foundational tools for achieving perfectly straight cuts with hand saws, circular saws, and routers. These guides, often constructed from wood, aluminum, or acrylic, provide a rigid reference point, eliminating wandering and ensuring accuracy. The IBUILDIT.CA project highlights a desire for improved gripping power compared to commercially available aluminum versions, which can slip during critical cuts.
The core principle involves clamping the guide firmly to the workpiece, creating a stable track for the saw’s base to follow. Self-clamping designs, as explored on IBUILDIT.CA, enhance usability by simplifying the clamping process. Effective straightedge guides minimize the risk of angled or uneven cuts, particularly beneficial for projects requiring precise dimensions and clean edges. They are versatile, adaptable to various materials and cutting depths, making them a staple in any woodworking shop.
Circular Saw Guides
Circular saw guides elevate accuracy when making long, straight cuts with a circular saw, surpassing freehand capabilities. These guides typically consist of a straightedge material – wood, aluminum, or acrylic – securely clamped to the workpiece. Utilizing a guide prevents blade drift, ensuring consistent cut lines and minimizing material waste. The need for a robust grip, as identified in the IBUILDIT.CA project regarding aluminum guides, is paramount for preventing slippage and maintaining precision.
Effective circular saw guides often incorporate features like non-slip surfaces and adjustable clamping mechanisms. They are particularly useful for cutting sheet goods like plywood and MDF, where maintaining a straight line over extended distances can be challenging. By providing a stable track, these guides enhance both the quality and safety of circular saw operations, delivering professional-looking results.
Jig Saw Guides
Jig saw guides are essential for achieving straight, controlled cuts, especially when the workpiece lacks a straight edge to follow. Unlike circular saw guides focused on long rips, jig saw guides often address curved or intricate cuts requiring consistent direction. These guides commonly involve a clamped straightedge, directing the jig saw base along the desired path. The importance of a secure clamping system, highlighted by the IBUILDIT.CA project’s focus on grip, is crucial to prevent guide movement during operation.

Effective jig saw guides can be constructed from various materials, offering versatility for different projects. They are particularly beneficial for cutting curves and shapes in thinner materials where maintaining a precise line is difficult. A well-designed guide minimizes blade wandering, resulting in cleaner, more accurate cuts and reducing the need for extensive sanding or correction.
Router Guides with Clamping Systems
Router guides, paired with robust clamping systems, elevate precision in edge profiling and pattern routing. These systems typically employ a template – often crafted from wood or acrylic – securely clamped to the workpiece. The router, fitted with a guide bushing, then follows the template’s contours, creating identical shapes with exceptional accuracy. The clamping aspect, mirroring the concerns addressed in the IBUILDIT.CA straightedge guide project, is paramount; any slippage compromises the final result.
Effective clamping ensures the template remains firmly in place throughout the routing process, preventing unwanted movement or vibration. Different clamping methods suit various workpiece geometries and template designs. These guides are invaluable for replicating intricate details, creating consistent joinery, and achieving professional-quality finishes, demanding a stable and reliable setup.

Materials Used in Construction
Guide construction utilizes wood (pine, maple, MDF), aluminum for rigidity, and acrylic for visibility; clamping materials include wood, metal, and rubber.
Wood Options for Guides (Pine, Maple, MDF)
When crafting clamp and saw guides from wood, several options present unique advantages and disadvantages. Pine, being the most affordable, is easy to work with but lacks the dimensional stability and hardness required for prolonged, precise use. It’s susceptible to warping and wear, making it suitable for less demanding applications or temporary guides.
Maple, a hardwood, offers significantly improved stability and durability. Its tighter grain structure resists warping and provides a smoother surface for guiding saws. However, maple is more expensive and harder to machine than pine.
MDF (Medium-Density Fiberboard) presents a cost-effective alternative with excellent flatness and stability. It’s particularly well-suited for guides where a perfectly smooth, consistent surface is crucial. However, MDF is prone to damage from moisture and produces a lot of dust when cut, requiring proper ventilation and safety measures.
Ultimately, the best wood choice depends on the budget, desired lifespan of the guide, and the precision requirements of the intended cuts.
Aluminum Guides – Pros and Cons
Aluminum clamp and saw guides offer a compelling blend of rigidity and lightweight construction, making them popular among woodworking enthusiasts. A significant advantage is their resistance to warping, ensuring consistent accuracy over time. They are also durable and can withstand repeated use without significant wear. However, as noted by IBUILDIT.CA, commercially available aluminum guides can sometimes suffer from inadequate clamping force.
This lack of grip can lead to slippage during cuts, compromising precision. Furthermore, aluminum’s smooth surface can be slippery, exacerbating this issue. While offering excellent straightness, aluminum doesn’t readily accept screws for modifications or adding clamping mechanisms.
Cost is another consideration; aluminum guides are generally more expensive than their wooden counterparts. Despite these drawbacks, aluminum remains a viable option, particularly for those prioritizing durability and straightness, provided a robust clamping solution is implemented.
Acrylic Guides – Visibility and Precision
Acrylic clamp and saw guides present a unique advantage: exceptional visibility. Their transparent nature allows users to clearly see the cutting line and the workpiece beneath, enhancing accuracy, especially when making intricate cuts. This feature is particularly beneficial for tasks requiring precise alignment or when working with delicate materials.
Acrylic’s smooth surface also minimizes friction, facilitating smooth saw movement. However, acrylic is inherently less rigid than aluminum or wood, potentially leading to deflection under heavy pressure.
Care must be taken to avoid scratching the surface, as imperfections can affect visibility and precision. While acrylic is relatively easy to machine and customize, its lower impact resistance necessitates careful handling. Despite these limitations, acrylic guides offer a compelling solution where visual clarity is paramount, providing a distinct advantage for specific applications.
Clamping Material Choices (Wood, Metal, Rubber)
Selecting the right clamping material is crucial for a secure and accurate clamp and saw guide setup. Wood offers affordability and ease of modification, allowing for custom clamping solutions, but can be prone to wear and compression over time. Metal clamps, like those made from aluminum or steel, provide superior strength and durability, ensuring a firm grip even under significant force.
However, metal can potentially mar the guide’s surface. Rubber clamping elements offer a compromise, providing a strong hold while minimizing the risk of damage.
The choice often depends on the specific application and the materials being used. IBUILDIT.CA’s designs highlight the importance of a tight grip, suggesting metal or high-density rubber are preferable to prevent slippage during critical cuts. Consider the workpiece material and the clamping pressure required for optimal performance.

Building Your Own Clamp and Saw Guide
Constructing a personalized guide, like the self-clamping straightedge from IBUILDIT.CA, allows for tailored precision and addresses shortcomings
of commercially available options.
DIY Straightedge Guide Construction (Based on IBUILDIT.CA)
Embarking on a DIY straightedge guide project, as detailed on IBUILDIT.CA, offers a cost-effective and customizable solution for achieving accurate cuts. The core concept revolves around creating a rigid straightedge, typically from wood, capable of securely clamping to your workpiece. IBUILDIT.CA’s approach focuses on overcoming the limitations of pre-made aluminum guides, specifically addressing issues with insufficient grip and subsequent slippage during critical cuts.
Construction begins with selecting appropriate wood – pine, maple, or MDF are common choices. The straightedge itself needs to be perfectly flat and true. Attention must be paid to creating a robust clamping mechanism, potentially involving threaded rods or cam levers, to ensure a firm hold. The guide’s length should accommodate the typical width of your projects. Following IBUILDIT.CA’s plans provides a solid foundation, but modifications can be made to suit individual needs and available materials. Precise measurements and careful assembly are paramount for optimal performance.
Creating a Self-Clamping Mechanism
A self-clamping mechanism is crucial for a functional straightedge guide, eliminating the need for separate clamps and ensuring consistent pressure. Inspired by IBUILDIT.CA’s designs, several approaches can be employed. One common method utilizes threaded rods passing through the guide’s base, with wing nuts tightened against the workpiece. This provides adjustable clamping force.
Alternatively, cam levers offer a quicker and more secure clamping action. These levers, when rotated, draw the guide tightly against the material. The design must account for the workpiece thickness, allowing for sufficient travel in the clamping mechanism. Robust construction is vital; the mechanism must withstand the forces generated during sawing without loosening or shifting. Careful consideration of material choices – metal for durability, wood for ease of modification – is essential for a reliable self-clamping system.
Ensuring Guide Stability and Grip
Stability and grip are paramount for accurate cuts with a clamp and saw guide; slippage compromises precision. Addressing the shortcomings of earlier aluminum designs, as noted by IBUILDIT.CA, requires careful attention to these factors. A wide base significantly enhances stability, resisting tipping during sawing. Incorporating non-slip material – rubber pads or textured surfaces – on the underside of the guide dramatically improves grip on the workpiece.
The clamping force must be sufficient to prevent movement, but not so excessive as to damage the material. A well-designed self-clamping mechanism, as previously discussed, plays a key role. Regularly inspect the guide for wear and tear, replacing worn components to maintain optimal performance. A stable, firmly gripped guide is the foundation of accurate and safe sawing.
Using a Clamp and Saw Guide Effectively
Proper technique maximizes accuracy; secure clamping, correct blade selection, and precise angle adjustments are crucial for consistently clean and reliable cuts.
Proper Clamping Techniques
Achieving a secure and stable clamp is paramount for accurate sawing with a guide. Insufficient clamping allows for movement, defeating the purpose of the guide and leading to inconsistent cuts. Begin by ensuring the guide is flush against the workpiece, eliminating any gaps that could cause shifting during operation.
Apply even pressure across the entire clamping surface; avoid concentrating force in a single area, which can distort the guide or damage the material. Consider using multiple clamps for longer guides or larger workpieces to distribute the pressure effectively.
Regularly inspect the clamps for slippage, especially during extended use. As noted by resources like IBUILDIT.CA, a common issue with some guides is inadequate grip. Therefore, periodically tighten the clamps to maintain a firm hold. Utilizing rubber pads or liners beneath the clamps can enhance grip and protect the workpiece surface from marring.
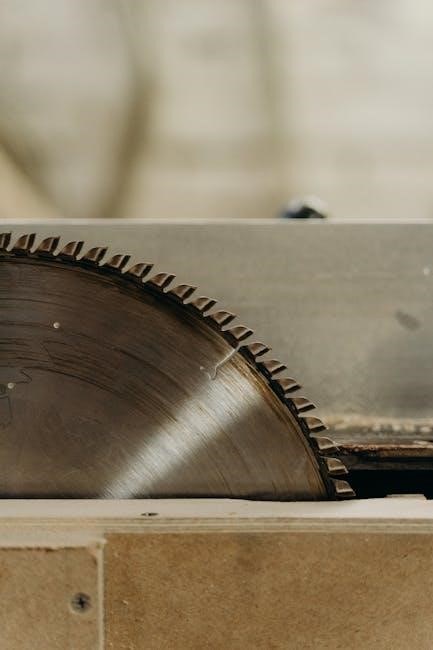
Saw Blade Selection for Optimal Results
Choosing the correct saw blade significantly impacts cut quality when using a clamp and saw guide. The blade’s tooth count and material should align with the workpiece material and desired finish. For clean, splinter-free cuts in hardwoods, a high tooth count blade (60-80 teeth) is recommended. Softer woods benefit from blades with fewer teeth (24-40), preventing burning and ensuring efficient cutting.
Consider the blade’s kerf – the width of the cut. A thinner kerf blade requires less power and produces less waste, but may be more prone to wandering if the guide isn’t perfectly secure. Ensure the blade is sharp; a dull blade increases the risk of kickback and produces rough edges.
Regular blade inspection and replacement are crucial for maintaining precision and safety when paired with a guide system.
Cutting Angles and Guide Adjustments
Achieving accurate angled cuts with a clamp and saw guide requires careful adjustment and understanding of the system’s capabilities. Most guides allow for angle adjustments, often using a protractor or adjustable fence. Precisely setting the angle before clamping is vital; double-check measurements to avoid costly errors.
When making angled cuts, ensure the guide remains firmly secured to the workpiece throughout the entire cut. Slight movements can compromise accuracy. For repetitive angled cuts, consider creating a dedicated jig or marking the angle directly on the guide for consistent results.
Fine-tuning adjustments may be necessary based on blade deflection and material variations.

Safety Considerations
Prioritize eye and ear protection while operating saws with guides, and always practice safe saw operation to prevent kickback incidents.
Eye and Ear Protection
When utilizing clamp and saw guides, safeguarding your vision and hearing is paramount. Woodworking and sawing operations generate substantial debris – sawdust, wood chips, and potentially even small fragments of the material being cut. These particles pose a significant risk of eye injury, ranging from minor irritation to serious corneal abrasions.
Therefore, always wear safety glasses or a face shield to create a physical barrier against these projectiles. Furthermore, the noise produced by saws, even with guides, can reach damaging levels, contributing to long-term hearing loss.
Consistent exposure to loud noises necessitates the use of earplugs or earmuffs; Choose ear protection with a Noise Reduction Rating (NRR) appropriate for the saw’s decibel level. Remember, preventative measures are crucial; protecting your eyes and ears ensures a safe and enjoyable woodworking experience with your clamp and saw guide.
Safe Saw Operation Practices
Employing safe practices when operating a saw alongside a clamp and saw guide is non-negotiable. Before initiating any cut, thoroughly inspect the saw blade for sharpness and damage. A dull or damaged blade increases the risk of kickback and inaccurate cuts. Ensure the guide is securely clamped to the workpiece, preventing movement during operation.
Maintain a firm grip on the saw, keeping both hands positioned for control. Avoid reaching over the blade or attempting to stop it manually. Always allow the blade to reach full speed before engaging the workpiece, and feed the saw smoothly and consistently.
Never force the saw; let the blade do the work. Be mindful of the power cord, keeping it clear of the blade’s path. After completing the cut, release the trigger and allow the blade to come to a complete stop before lifting the saw.

Avoiding Kickback with a Guide
Kickback, a sudden and dangerous reaction, is a primary concern when using saws; a clamp and saw guide significantly mitigates this risk. Ensuring the guide remains firmly secured is paramount – a slipping guide invites kickback. Maintain consistent pressure against the guide throughout the cut, preventing the workpiece from binding on the blade.
Avoid pinching the blade, which occurs when the wood closes in behind the saw. Use wedges or spacers if necessary to maintain an open kerf. Never attempt to cut freehand if the guide is compromised. Regularly inspect the guide for wear and tear, replacing it if it’s unstable.
Proper blade selection is crucial; a sharp blade reduces the likelihood of binding. Always stand to the side of the blade’s path, never directly in line with it, to minimize injury in the event of kickback.

Advanced Techniques and Modifications
Enhance guide performance with non-slip surfaces, custom shapes tailored to projects, and integrated dust collection for cleaner, more efficient cutting operations.
Adding Non-Slip Surfaces to Guides
Improving the grip between your clamp and saw guide and the workpiece is crucial for accuracy and safety. Slippage can lead to inaccurate cuts and potentially dangerous situations, especially with power tools. Several materials can be effectively used to create non-slip surfaces. Consider applying rubberized shelf liner, readily available at most hardware stores, to the underside of the guide. This provides excellent friction against most wood surfaces.
Alternatively, cork sheeting offers a natural, effective non-slip solution. For a more permanent bond, use a spray adhesive designed for bonding rubber or cork to wood or metal. Another option is to apply a textured spray coating, creating a slightly rough surface that enhances grip. Ensure the adhesive is fully cured before using the guide. Regularly inspect the non-slip surface for wear and tear, replacing it as needed to maintain optimal performance and safety.
Creating Custom Guide Shapes
Beyond straight lines, many projects demand curved or angled cuts, necessitating custom guide shapes. This requires a bit more planning and fabrication, but significantly expands the versatility of your clamp and saw guide system. Begin by creating a template of the desired shape using cardboard or thin plywood. Transfer this template onto your guide material – wood, aluminum, or acrylic – and carefully cut it out using a jigsaw or bandsaw.
For complex curves, consider using a flexible material like acrylic, which can be bent and secured in the desired shape. Ensure the custom shape is securely clamped to the workpiece to prevent movement during cutting. You may need to modify your clamping system to accommodate the unique contours of the guide. Regularly test the guide’s accuracy and adjust as needed for optimal results.
Integrating a Dust Collection System
Effective dust control is crucial for a clean and safe workshop, and integrating a system with your clamp and saw guide enhances usability. A simple method involves attaching a shop vacuum hose directly to the saw’s dust port. For more sophisticated setups, consider building a shroud around the cutting area of the guide. This shroud connects to a dust collection hose, capturing sawdust at the source;
Ensure the shroud doesn’t interfere with the saw blade or clamping mechanism. Strategically placed brush strips can seal gaps, maximizing dust capture efficiency. Regularly check and empty the dust collection container to maintain optimal suction. A clean workspace improves visibility and reduces health hazards associated with airborne particles, making your projects more enjoyable and safer.